Power Drill Safety for Kids Under 10: A Parent's Guide
By Marco Silva • 15th Feb
Children's power drill safety and kids workshop safety matter more than most parents realize. A drill in the wrong hands (without proper setup, instruction, and supervision) can cause serious injury in seconds. For a broader overview of safe handling, see our power drill safety guidelines. But a well-taught child working under clear boundaries and on properly sized, configured tools becomes confident, capable, and safer. This guide answers the core questions parents and educators face when introducing young builders to power tools.
FAQ: Setting Up Safe Drilling for Young Learners
What Age Should Kids Start Using a Power Drill?
There is no universal "magic age." Instead, focus on maturity, understanding of consequences, and physical capability. The consensus from safety experts is clear: under age 8, avoid unsupervised drilling entirely. For younger children in structured, adult-led projects, pre-drilling pilot holes by an adult and letting kids drive screws (with full supervision and proper PPE) is safer. By ages 8-10, mature children working on age-appropriate drill tools (smaller, lighter models with lower torque and responsive clutches) can begin to learn basic drilling under constant, hands-on supervision.
The key is not age alone, but whether the child understands "this tool is not a toy," can follow multi-step instructions, and will respond calmly if something goes wrong.
A drill is not a toy; the child must prove they understand that first.
How Do I Choose a Drill Suitable for Kids?
Avoid the temptation to hand a child your full-sized professional drill. Instead, prioritize these features for child-safe power tools: If ergonomics are a concern, our top cordless drills for small hands can help you find a safer fit.
- Lower torque and RPM: 3-5 Newton-meters of torque and max 400-600 rpm. This keeps the drill responsive but prevents violent kickback if the bit binds.
- Compact head and lighter weight: A shorter drill head fits tight spaces (kids often work in birdhouse-sized projects) and lighter weight reduces fatigue and loss of control.
- Responsive, progressive trigger: A trigger that tracks finger pressure (not an on/off switch) gives the child instant speed control and the ability to feel resistance without jamming.
- Clutch setting: A drill with an adjustable clutch that disengages at a preset torque prevents stripping pilot holes and teaches the child to "set the clutch, save the wrist" before every session.
- Auxiliary handle: A side handle, firmly mounted, gives the child a second grip point and dramatically improves balance if the bit suddenly catches.
- Visible, accessible battery: Kids should be able to see and feel when power is low, building responsibility for charging and planning.
What About Supervision (How Hands-On Must I Be)?
Supervision is non-negotiable. "Hands-on" means different things by age:
- Ages 6-7: The adult controls the drill. The child measures, marks, and prepares the workpiece. The adult guides the child's hand placement and watches for unsafe positioning.
- Ages 8-9: The child holds and operates the drill under direct, immediate adult supervision. The adult sits beside or behind the child, hands ready to intervene. The adult pre-drills pilot holes or sets a clutch so the child's task is screw-driving, which is lower risk.
- Ages 9-10 (mature): Supervised drilling into soft woods or pre-marked positions with a responsive drill and working clutch. The adult is in the room, watching continuously, and steps in before a mistake happens, not after.
Crucially: never leave a powered tool and a child alone in the room, even for 30 seconds. If you must leave, take the tool or the child with you.
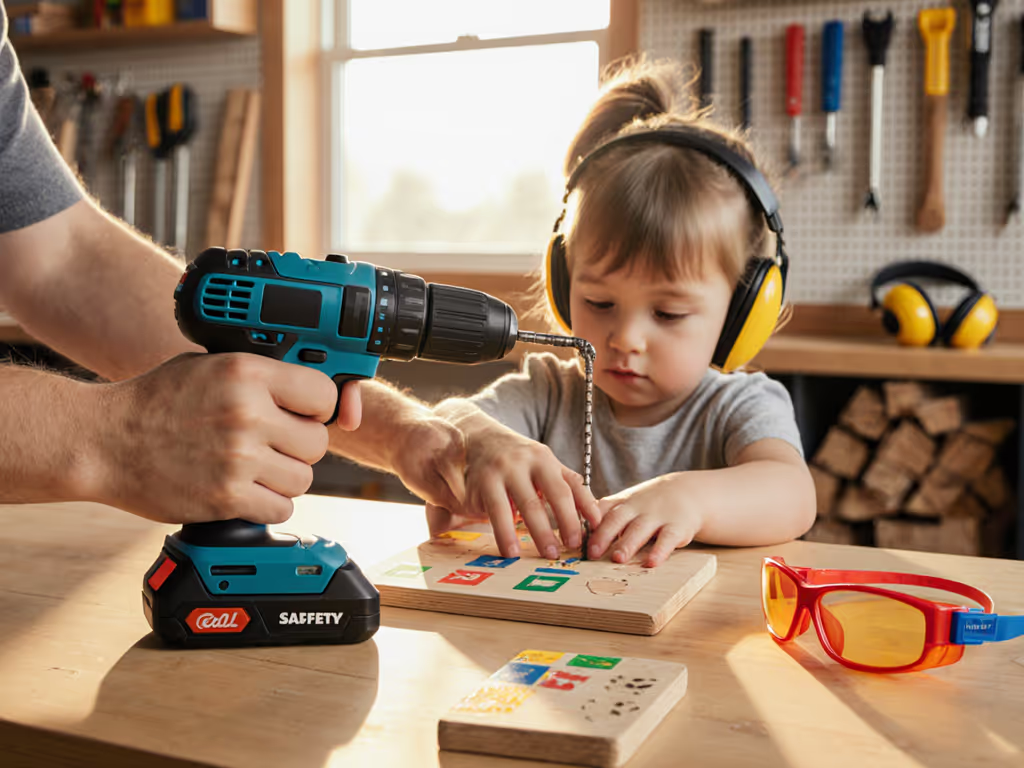
What Personal Protective Equipment Do Kids Need?
Safety goggles are mandatory (chips and dust travel fast). Ensure the goggles fit snugly and are designed for power-tool use, not just sun glare.
Additional PPE:
- Closed-toe shoes: No sandals or flip-flops near rotating bits.
- Tied-back or short hair: Long hair near a spinning chuck is a serious entanglement risk.
- No loose clothing, bracelets, or dangling necklaces: These catch on rotating parts.
- Work gloves (with caution): Gloves protect against splinters, but they can catch a spinning chuck. Use them only when the drill is powered off and are not needed during operation. Some pros skip them during drilling for this reason.
- Ear protection (optional but wise): A drill is loud, and hearing fatigue is real; foam plugs are cheap and save hearing.
How Do I Teach Safe Drilling Technique?
Grip and posture are where most young drillers fail:
- Two-handed grip: Both hands on the drill, always. One on the handle, one on the side handle or base. No single-handed operation, ever.
- Stable stance: Feet shoulder-width apart, body slightly angled so the child can brace themselves if the drill twists.
- Wrist straight, not bent: A bent wrist cannot absorb torque. Teach the child to "feel" the drill through the bit, not through the wrist.
- Pilot holes first: Always. A pilot hole is a visual cue for the bit and reduces required torque by 70 percent. Pre-drill for very young kids; let older kids drill their own pilot holes in soft wood.
- Steady downward pressure, not force: The drill's weight and the bit's sharpness do the work. "Let the tool do the job" is a mantra that sticks.
What About Kickback and Binding?
Kickback (the sudden twisting of the drill if the bit jams) is the most violent hazard. It can snap wrists and cause loss of control. Reduce kickback risk:
- Set the clutch before every session so the bit disengages if resistance spikes. This is not optional; it is the most important setup step. Learn how to dial it in with our drill clutch mechanics guide.
- Use a responsive, lower-torque drill so binding is less likely to be violent.
- Teach the child to expect resistance: "If it feels hard, pause and back out. Don't push harder." This trains the child to respect the tool and to problem-solve (Is the bit dull? Is the pilot hole off-center?) instead of forcing it.
- Secure the workpiece with a clamp. A floating piece of wood rotates with the drill. A clamped piece doesn't. Clamping removes that variable. See clamp types and safe setups in our power drill accessories guide.
Fatigue is a hidden cost; balance beats raw weight every day. A lighter drill with good balance is safer for young hands because it doesn't tire them out mid-project, and fatigue-free hands are precise, controlled hands.
What Electrical Safety Matters for Kids Using Power Tools?
Electrical hazards are different from mechanical injury, but equally serious:
- GFCI protection: Plug the drill into a ground fault circuit interrupter (GFCI) outlet or power strip. A GFCI cuts power in milliseconds if a fault is detected and prevents electrocution.
- Cord inspection: Check the cord before use. No cuts, exposed wires, or damage. A damaged cord is a fire and shock hazard.
- Hands and water don't mix: Never use a powered drill near water, wet hands, or in damp conditions. Even cordless drills have electrical hazards inside.
- Safe unplugging: Teach the child to grasp the plug itself, not pull the cord.
- Keep cords away from sharp edges and heat: Cords damage easily, and damaged cords are dangerous.
For cordless drills, the risks are lower, but the same principles apply: keep the battery dry, don't expose it to extreme temperatures, and don't let kids tinker with the battery or charger.
What Materials Are Safest for Learning?
Start with soft, forgiving materials:
- Softwoods (pine, fir, cedar): Soft, easy to drill, low risk of bit breakage.
- Plywood: Uniform and predictable; less prone to tear-out than solid wood if you use a pilot hole.
- Composite materials (MDF, hardboard): Consistent and safe, though dustier. Proper dust control (goggles, vacuumed workspace) is essential.
Avoid: Metal, hardwoods, pressure-treated lumber, and concrete until the child is older and more experienced. These materials require higher torque, sharper bits, and finer technique (all beyond young learners).
How Do I Prevent Fatigue and Injury Over Multiple Projects?
Fatigue erodes focus and technique. A tired child makes mistakes. Watch for these signs:
- Drooping posture or the child leaning on the drill instead of holding it level.
- Gripping harder, as if that will compensate for fatigue.
- Hesitation or slower movement, a sign the child's small muscles are tired.
- Complaining about wrist or hand soreness.
Pause the project. Take a break. This isn't weakness; it's wisdom. A 10-minute rest, a drink of water, and a return to the task with fresh hands is far safer than pushing through.
Also, ensure the setup reduces strain from the start: a lower-torque drill, a responsive clutch, and a side handle mean the child's wrist and hand do less bracing work. An adjustable workbench height so the child isn't reaching up or hunching down also matters. These details prevent the wrist rubbing and hand soreness that signal cumulative stress. For tool care that keeps performance consistent (and reduces user fatigue), see our power drill maintenance guide.
Summary and Final Verdict
Children's power drill safety is achievable and worth the investment in time and setup. The goal is not to keep kids away from workshops but to teach them that supervised drilling techniques and proper tool configuration create an environment where young makers can learn, build confidence, and stay safe.
Before your child picks up a drill:
- Choose an age-appropriate drill tool: Lower torque, compact head, responsive trigger, and clutch.
- Commit to hands-on supervision: Be in the room, watching, ready to step in.
- Teach grip, posture, and respect for the tool: Practice on soft materials with pilot holes.
- Set the clutch, use a clamp, and secure the workpiece: These three habits prevent most accidents.
- Watch for fatigue and pause before mistakes happen. A tired child is an unsafe child.
- Ensure GFCI protection and cord safety to eliminate electrical hazards.
When you see a child's face light up as a screw sinks smoothly into wood they've prepared themselves, and their confidence grows because the drill responded to their hand and not the other way around, you'll understand why early maker education matters. The confidence, problem-solving, and respect for tools built in a safe workshop today carries forward for life.
Fatigue is a hidden cost; balance beats raw weight every day. A lighter, responsive drill in a well-supervised setup is safer, more effective, and more rewarding than a heavy "grown-up" tool. That is the foundation of kids' workshop safety.
Related Articles